Motion videos
Pro
Describe a short animated video, play it, change it by chat and export an MP4 from your browser.
A Motion video is a short animation (a launch teaser, a logo sting, a product reel, animated type) that the AI writes for you. You can play it, change it by chatting, edit its code, and export it as an MP4.
Make one#
- Open Design Studio and choose Motion video as the type. Pick a size: 16:9, vertical 9:16, square or 4:5.
- Describe the video: who it is for, the words you want on screen, the mood. A line like "A 15 second teaser for Lumen Coffee, warm and handmade. Show Slow, Small, Better, then the logo" works well.
- Choose a Style (or leave it on Let the AI choose), a Length (6 to 60 seconds) and a frame rate.
- Add your logo or photos with the paperclip if you want them in the video. A file named like "logo" is used as the logo.
- Press the arrow. It takes about a minute. The editor opens with the video ready to play.
Not sure what to make? Press Surprise me. If the box is empty it invents an idea and picks a style and length, then makes the video. If you already typed an idea it keeps it and only surprises you with the look.
Make a video from a project#
A finished website or app can become a launch film, product demo, explainer or social ad, with the real page in it and an optional music track and AI cinematic shots. See Make a video from a project.
Turn a design into a video#
Any design you already made in Design Studio can become a video with no AI cost. On the design's card, or in the editor's top bar, press Make a video. Choose how layers come in (rise, pop or slide), how long each page stays, and how pages hand over (slide, fade or zoom). Each page becomes a scene with your real layers, fonts and pictures. The result is an ordinary video you can retime in Code, change by chat, and export.
Play and change it#
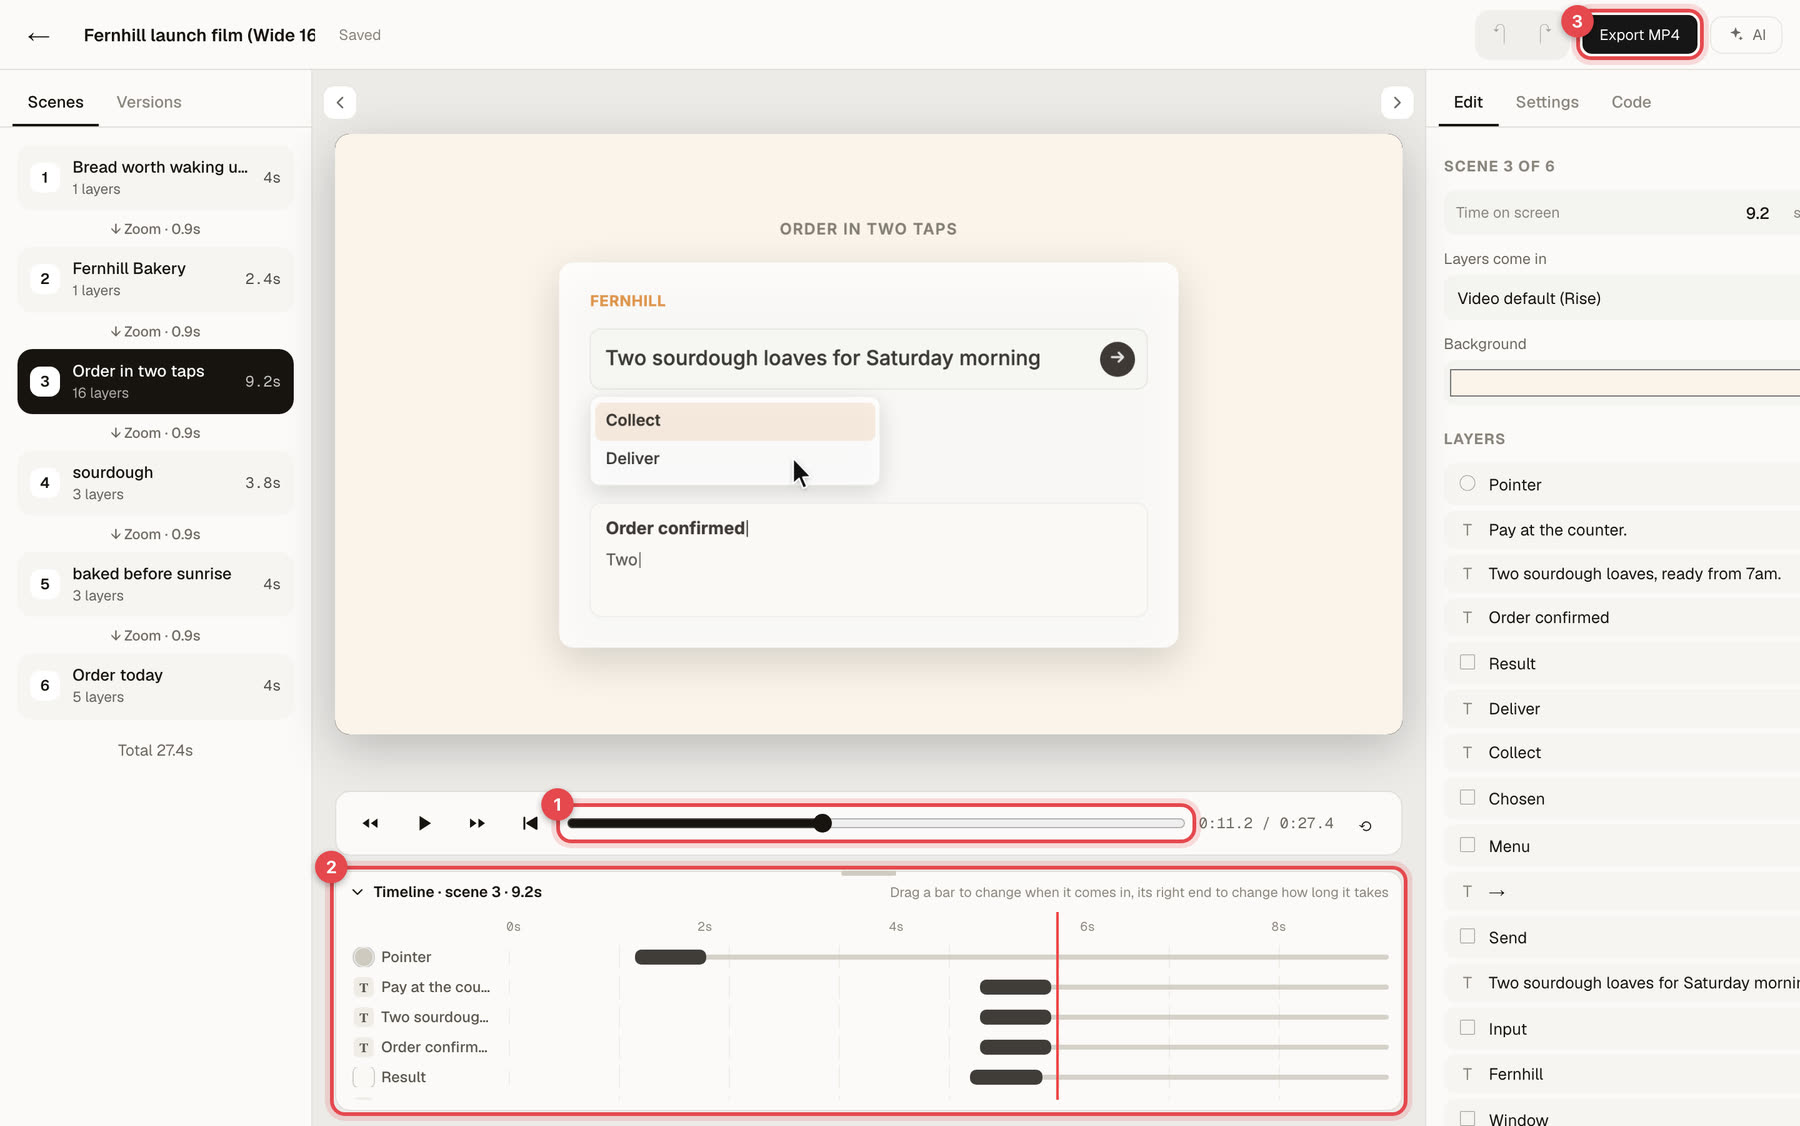
- Play, pause and scrub with the bar under the video: drag the bar or click it to jump anywhere, even while it plays. The buttons beside play go back or forward 5 seconds, or back to the start. Space plays and pauses, and the arrow keys step one frame (hold Shift for ten).
- Edit with AI: say what to change ("make the first word yellow, slow the intro down, end on the logo"). The AI keeps the rest and saves the old version under Earlier versions, where you can restore it.
- Change any picture. Click a photo in the video (or choose it in the Layers list) and use Replace picture… on the right to upload your own, or pick one that is already in the video. You can also change how it fits (fill the box or show all of it) and its corner radius. Add picture… in a scene puts a new one in. Every change can be undone.
- Settings change the length and frame rate. For a video the AI wrote, Settings also lists its logo and photos, where you can replace, remove or add them.
- Code shows the animation. You can edit it and press Run. The code runs in a sealed frame: it cannot reach the internet, your account or the rest of Site Haus.
Smooth changes between scenes#
A video made from a design changes scene with Smooth by default: the old scene drifts away and dims a little while the new one fades and settles in, with gentle starts and stops. You can pick another change for the whole video or for one scene (Slide, Slide up, Fade, Zoom, Wipe or Cut) and set how long it takes. Changes of 0.6 seconds or more feel best.
A video made earlier shows an Update the video box at the top of the Edit panel. Press it to give the video the newest drawing code, switch its changes to Smooth and lengthen very quick ones. It is one undo step, and if the new code does not work on that video it is put back.
Move things right on the video#
For a video made from a design, click a layer in the video to select it. Then:
- Drag it to move it. Pink guides appear and it snaps to the middle and edges of the video and to other layers. Hold Shift to move in a straight line and Alt to turn snapping off.
- Pull a handle on its edge or corner to resize it. Hold Shift on a corner to keep its shape (pictures always keep it).
- Pull the round handle above it to rotate. Hold Shift for steps of 15°.
- Use the arrow keys to nudge it by 1 pixel (Shift for 10). With nothing selected, the arrow keys step through frames as before.
Other keys with a layer selected: ⌘D duplicates it, ⌘C and ⌘V copy it into another scene, Delete removes it, [ and ] move it back and forward, Esc deselects it. ⌘Z undoes any of these.
The Align buttons in the Edit panel put it against the left, right, top or bottom of the video, or in the middle.
The layer timeline#
Under the video, the Timeline shows when each layer of the current scene comes in. Each bar is one block from the moment the layer comes in until the scene ends. Drag a bar to change when it starts, or drag the small notch inside it to change how long the layer takes to come in. Click a name to select the layer, or click the empty track to move the playhead. Fold it away with the arrow if you want more room.
Add text and shapes, and style them#
In a scene's panel, press Text, Rectangle, Circle or Line to add one. Text layers have a Text style section: font, weight, size, alignment, line height, letter spacing, italic, capitals and underline. Shapes can have rounded corners, an outline and a shadow, and any layer can have a shadow.
Music#
In Settings, press Add music and choose an MP3, M4A, WAV or OGG file (up to 15 MB). It plays with the video while you edit. Set the volume, a fade in and a fade out, and where in the song to start. A song shorter than the video plays again from the start. When you export, the music is mixed into the MP4 (in a browser that cannot encode audio, the video is exported without it and you are told). The After Effects download does not include music.
Export#
Press Export MP4. The video is made in your own browser, one frame at a time, so keep the tab open until it finishes (a 15 second 1080p video usually takes under a minute). Nothing is rendered on Site Haus servers.
Exporting needs a recent Chrome, Edge or Safari on a computer. A video with music has it mixed in (see Music above).
Take it into After Effects#
For a video made from a design, the export window also has Download for After Effects (.zip). The ZIP holds a script that builds the video again inside After Effects: one composition per scene, live text, shapes and pictures on their own layers, shadows, gradients, the entrance animation as keyframes, and the hand-over between scenes. Pictures and a list of the fonts to install are included, and FILES/INSTRUCTIONS.pdf explains the steps.
- Install the fonts listed in
ASSETS/fonts-used.txt. - In After Effects turn on Allow Scripts to Write Files and Access Network (Settings > Scripting & Expressions).
- Choose File > Scripts > Run Script File… and pick
AE/build-project.jsx.
After Effects does not accept a ready-made project from outside, so the script makes it for you; save the result as your own .aep. Videos written by the AI chat cannot be exported this way, because they are code rather than layers.
Tips#
- Keep the words short and few. Each screen needs time to be read.
- Name a feeling or a reference ("like a Swiss poster", "like a retro game") for a more distinctive result.
- If something looks wrong, ask the AI to fix that exact thing. If the animation stops with an error, the message says what failed.